Angela Lee's Web Portfolio
Introduction to Digital Media 7361
Fall Semester 2016
Menu OptionsDigital Image ProjectProject Description: In this project we were required to create a banner and an icon using three images from the image project files of Canvas online. The banner and icon would be designed for a specific purpose for a client who would be building a website for parenting and the influence they have on their children. One image would be for a background and the two other would be overlapping foreground images. The rubric we followed required resizing the background image to 1000 x 400px. Using Photoshop students were to create layers to manipulate the images. We used masking and the gradient tool to blend from 0 transparency to 100 percent opacity. We were to include text using a title for the website. We saved the image in .JPG After creating the banner and taking a screenshot of the layers in Photoshop we made a URL for our banner and icon. I chose the title because parenting is in fact a journey for us all, young and old. We never know it all. 
Digital Image ProjectProject Desrciption:
The icon was created in Photoshop. I resized the image to 100 x 100 pixels under canvas size. I had to adjust and crop to make it work. See below. Icon.
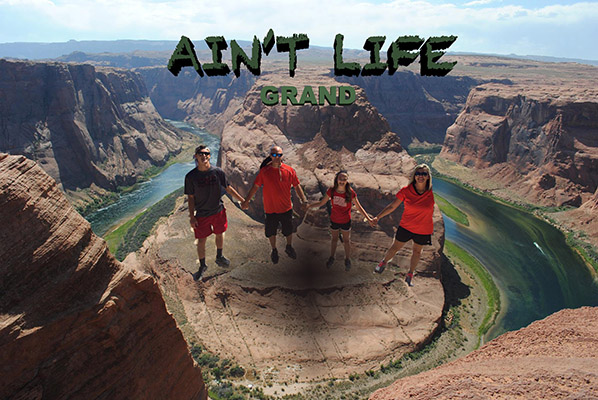
Digital Image Project Project Description: Below is the process I used to edit my original family photo taken at the Grand Canyon. I pasted it onto the photo taken at Horshoe Bend. It was the only family picture we took the time to make and I was upset to not have one made in front of the amazing Horseshoe Bend. So thanks to Photoshop I was able to fix it. Below is the process. First, I right clicked on the original photo and selected Open With. I opened with Adobe Photoshop CC 2015.5 After that, I chose to use the magnetic tool to cut out my family picture just as I learned to do in Part One of the assignment. After selecting the magnetic tool I began clicking in small sections around the family until all were selected. Then I chose Edit and selected cut. I made certain that the lock icon was not selected so that I could work on the Layer/Background. Next I chose another photo taken at Horseshoe Bend, near the Grand Canyon. I wanted to place our photo in that picture because it was so crowded there the day we visited we didn’t get to make a picture of us at that location. I opened the photo again with Photoshop. Then I clicked on Edit and paste. The picture of my family appeared in the photo of Horseshoe Bend. Finally, I used the Eraser from the left hand column to erase my left arm. The person taking my picture cut off part of my arm in the picture. I thought it looked better after using the tool. This is the only picture we took time to make of our entire family on our Bucket List vacation and part of my arm was cut. I used the blur tool in the left hand column to blur the cuts from the magnetic lasso tool. This concludes the description.
|